When people hear “build a connector,” they often expect custom backend code, queueing, retry logic, deployment overhead, and a long stabilization phase.
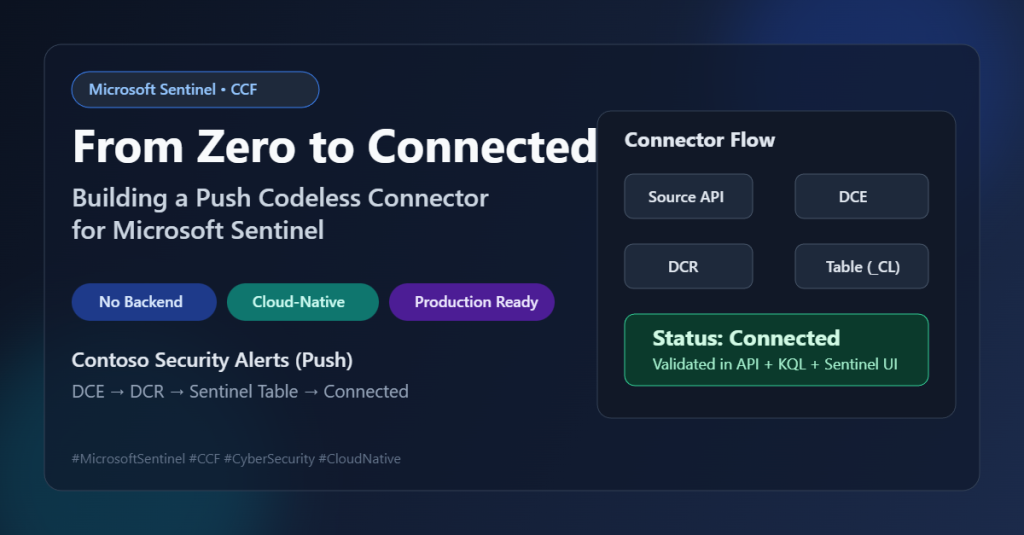
For this post, I took a different path: I used the Microsoft Sentinel Codeless Connector Framework (CCF) to onboard a custom data source (Contoso Security Alerts) with a Push integration model.
The result: a cloud-native connector, deployed through ARM templates, visible in the Sentinel Data Connectors gallery, with built-in operational monitoring and no custom service to host.
The Codeless Connector Framework (CCF) provides partners, advanced users, and developers the ability to create custom connectors for ingesting data to Microsoft Sentinel.
Connectors created using the CCF are fully SaaS, with no requirements for service installations. They also include health monitoring and full support from Microsoft Sentinel.
Use the following steps to create your CCF connector and connect your data source to Microsoft Sentinel
- Build the data connector
- Create the ARM template
- Deploy the connector
- Connect Microsoft Sentinel to your data source and start ingesting data
Why CCF data connector
CCF data connector is useful when you want to move quickly without building and maintaining ingestion middleware.
It gives you:
- Configuration-driven connector development
- Native Sentinel integration and connector UX
- Managed ingestion path via Azure Monitor DCE/DCR
- Operational visibility and health status inside Sentinel
In short: less platform code, more focus on schema quality, mapping, and reliability.
For App registration in Entra ID I used Contoso Security Alerts Push Connector Application with client secrets

What I built
I implemented a Contoso Security Alerts (Push) connector with these core components:
- Custom output table in Log Analytics:
ContosoSecurityAlerts_CL - Data Collection Endpoint (DCE) for ingestion
- Data Collection Rule (DCR) with stream declaration and data flow mapping
- Connector Definition (
dataConnectorDefinitions) for Sentinel gallery UX - Push data connector rule (
dataConnectors, kindPush) that binds runtime ingestion values
Architecture in one view
Data source events flow through this path:
Contoso Source → Push API call → DCE endpoint → DCR stream mapping → ContosoSecurityAlerts_CL → Sentinel connector status & queries
The connector UI in Sentinel displays onboarding instructions and operational fields (tenant/app/endpoint/DCR stream details), while KQL queries provide data and health verification.

Step 1 — Understand the data shape before deployment
Before touching templates, I validated the source event model and mapped required fields to the destination schema.
For this connector, the key fields included:
TimeGeneratedEventSeverityEventTypeUserNameSourceIPDeviceIdAlertMessage
This schema-first approach prevented rework later in DCR mapping and query design.
Step 2 — Deploy runtime ingestion resources
The runtime layer was deployed first:
- Custom table
- DCE
- DCR
After deployment, I captured the outputs that matter operationally:
dceLogsIngestionEndpointdcrImmutableIdstreamName(Custom-ContosoSecurityAlerts)
These outputs become the contract used by the Push connector rule.
Step 3 — Deploy the connector definition (Sentinel UX)
Next, I deployed the CCF definition resource so the connector appears in Sentinel Data Connectors.
The definition included:
- Connector identity and publisher metadata
- Sample KQL queries
- Data type configuration
- Last-data-received logic
- Connectivity criteria based on query-driven status
- Step-by-step instruction blocks in the UI
This part is often underestimated, but it is critical: the definition is what turns raw ingestion plumbing into an operator-friendly connector experience.
Step 4 — Deploy the Push connection rule
With runtime resources and definition in place, I deployed the dataConnector (kind Push) and linked it to:
- DCE endpoint
- DCR immutable ID
- Stream name
- Connector definition name
This is the “bind” step where everything becomes active.
A successful readback should confirm:
kind = PushisActive = true- Correct
dcrConfigvalues
This creates `dataConnectorDefinitions` + metadata (CCF UI ).
Powershell commands:
$rg = ‘sentinel-rg’
$deploymentName = “contoso-definition-$(Get-Date -Format yyyyMMddHHmmss)”
az deployment group create \
–resource-group $rg \
–name $deploymentName \
–template-file personal/contoso-definition-hotfix.json \
–parameters workspace=LogAnalytics1 workspace-location=francecentral
After deployment, verify the definition resource:
Mandatory powershell variable and commands:
$sub = ’74c5f87b-c853-4d0f-8ec5-c8cc00ca8761′
$ws = ‘LogAnalytics1’
$def = ‘ContosoSecurityAlertsPush’
az rest –method get –url “https://management.azure.com/subscriptions/$sub/resourceGroups/sentinel-rg/providers/Microsoft.OperationalInsights/workspaces/$ws/providers/Microsoft.SecurityInsights/dataConnectorDefinitions/$def?api-version=2022-09-01-preview”
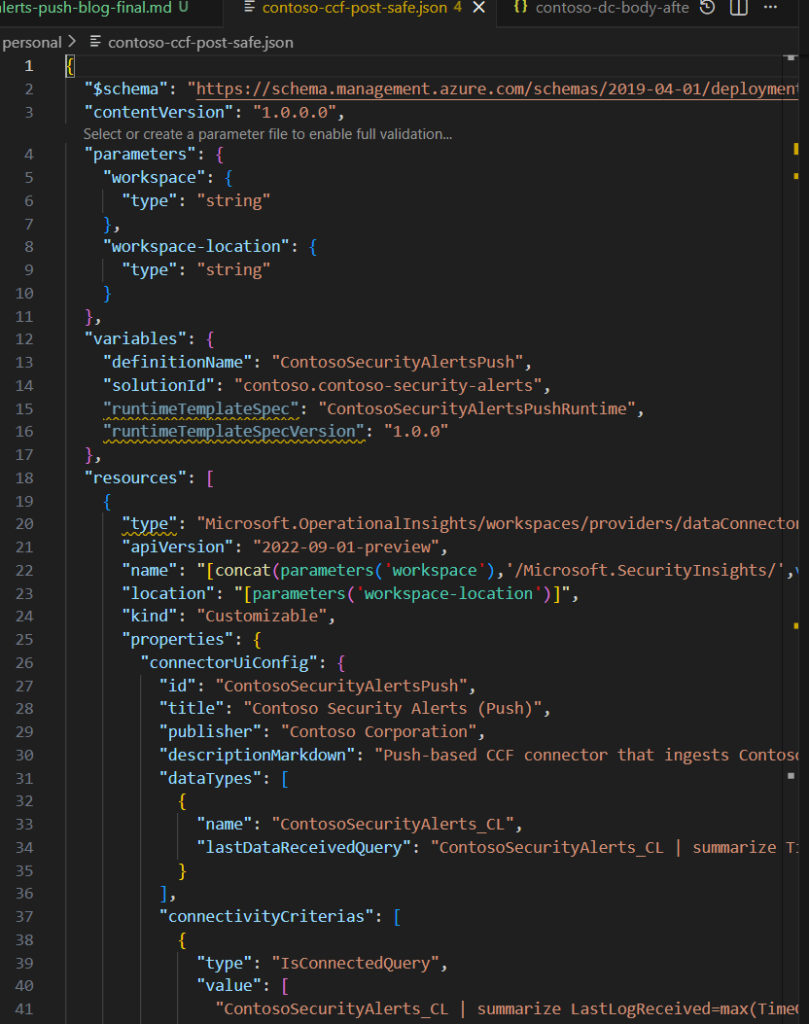
This is contoso-ccf-post-safe.json main for deployment in Visual Code Studio
{
“$schema”: “https://schema.management.azure.com/schemas/2019-04-01/deploymentTemplate.json#”,
“contentVersion”: “1.0.0.0”,
“parameters”: {
“workspace”: {
“type”: “string”
},
“workspace-location”: {
“type”: “string”
}
},
“variables”: {
“definitionName”: “ContosoSecurityAlertsPush”,
“solutionId”: “contoso.contoso-security-alerts”
},
“resources”: [
{
“type”: “Microsoft.OperationalInsights/workspaces/providers/dataConnectorDefinitions”,
“apiVersion”: “2022-09-01-preview”,
“name”: “[concat(parameters(‘workspace’),’/Microsoft.SecurityInsights/’,variables(‘definitionName’))]”,
“location”: “[parameters(‘workspace-location’)]”,
“kind”: “Customizable”,
“properties”: {
“connectorUiConfig”: {
“id”: “ContosoSecurityAlertsPush”,
“title”: “Contoso Security Alerts (Push)”,
“publisher”: “Contoso Corporation”,
“descriptionMarkdown”: “Push CCF connector for Contoso security alerts to Microsoft Sentinel.”,
“dataTypes”: [
{
“name”: “ContosoSecurityAlerts_CL”,
“lastDataReceivedQuery”: “ContosoSecurityAlerts_CL | summarize Time=max(TimeGenerated) | where isnotempty(Time)”
}
],
“connectivityCriterias”: [
{
“type”: “IsConnectedQuery”,
“value”: [
“ContosoSecurityAlerts_CL | summarize LastLogReceived=max(TimeGenerated) | project IsConnected=LastLogReceived > ago(7d)”
]
}
],
“instructionSteps”: [
{
“title”: “1. Deploy runtime resources”,
“description”: “Deploy table, DCE, and DCR for push ingestion.”,
“instructions”: [
{
“type”: “DeployPushConnectorButton”,
“parameters”: {
“label”: “Deploy Contoso Push resources”,
“applicationDisplayName”: “Contoso Security Alerts Push Connector”
}
}
]
},
{
“title”: “2. Configure source app”,
“description”: “Use the generated values below for push calls.”,
“instructions”: [
{
“type”: “CopyableLabel”,
“parameters”: {
“label”: “Data Collection Endpoint Uri”,
“value”: “<DCE_INGESTION_ENDPOINT>”
}
},
{
“type”: “CopyableLabel”,
“parameters”: {
“label”: “Data Collection Rule Immutable ID”,
“value”: “<DCR_IMMUTABLE_ID>”
}
},
{
“type”: “CopyableLabel”,
“parameters”: {
“label”: “Stream Name”,
“value”: “Custom-ContosoSecurityAlerts”
}
}
]
}
]
},
“connectionsConfig”: {
“templateSpecName”: “<TEMPLATE_SPEC_RESOURCE_ID>”,
“templateSpecVersion”: “1.0.0”
}
}
},
{
“type”: “Microsoft.OperationalInsights/workspaces/providers/metadata”,
“apiVersion”: “2023-04-01-preview”,
“name”: “[concat(parameters(‘workspace’),’/Microsoft.SecurityInsights/DataConnector-‘,variables(‘definitionName’))]”,
“properties”: {
“parentId”: “[extensionResourceId(resourceId(‘Microsoft.OperationalInsights/workspaces’, parameters(‘workspace’)), ‘Microsoft.SecurityInsights/dataConnectorDefinitions’, variables(‘definitionName’))]”,
“contentId”: “[variables(‘definitionName’)]”,
“kind”: “DataConnector”,
“version”: “1.0.0”,
“source”: {
“kind”: “Solution”,
“name”: “ContosoSecurityAlerts”,
“sourceId”: “[variables(‘solutionId’)]”
},
“author”: {
“name”: “Contoso Corporation”
},
“support”: {
“name”: “Contoso Corporation”,
“tier”: “Partner”,
“link”: “https://www.contoso.com/support”
}
}
}
],
“outputs”: {}
}
In Summary:
Step 4.1 — Deploy the connector definition (ARM)
Use these deployment parameters (JSON):
{
“$schema”: “https://schema.management.azure.com/schemas/2019-04-01/deploymentParameters.json#”,
“contentVersion”: “1.0.0.0”,
“parameters”: {
“workspace”: {
“value”: “LogAnalytics1”
},
“workspace-location”: {
“value”: “francecentral”
}
}
}
Saved as:
– `docs/bicep/devops/manual-steps/contoso-release-package/templates/contoso-definition-hotfix.parameters.json`
Set subscription and resource group:
“`powershell
$subscriptionId = “<subscription-id>”
$resourceGroup = “<resource-group>”
Deploy in powershell:
az account set –subscription $subscriptionId
az deployment group create \
–resource-group $resourceGroup \
–name “contoso-security-alerts-push-release” \
–template-file “docs/bicep/devops/manual-steps/contoso-release-package/templates/contoso-definition-hotfix.json” \
–parameters @docs/bicep/devops/manual-steps/contoso-release-package/templates/contoso-definition-hotfix.parameters.json
What this gives you:
– connector UI definition,
– runtime template spec outputs,
– metadata links required by Sentinel content model.
Step 4.2 — Create/refresh the installed Push connector
Connector runtime payload (JSON) used by `az rest –body`:
{
“kind”: “Push”,
“properties”: {
“connectorDefinitionName”: “ContosoSecurityAlertsPush”,
“dcrConfig”: {
“streamName”: “Custom-ContosoSecurityAlerts”,
“dataCollectionEndpoint”: “https://contososecurityalertsdce-tw4s.francecentral-1.ingest.monitor.azure.com”,
“dataCollectionRuleImmutableId”: “dcr-f113d68d2a3244ddbb3d785041fd93b8”
},
“auth”: {
“type”: “Push”,
“AppId”: “fd63552b-4f92-42d8-8333-69006c44b4d9”,
“ServicePrincipalId”: “c87ef7c8-81f7-49ac-a2c1-128e67e0122b”
},
“isActive”: true
}
}
Saved as:
– `docs/bicep/devops/manual-steps/contoso-release-package/payloads/contoso-push-dc-recreate.json`
“`powershell
az rest –method put \
–url “https://management.azure.com/subscriptions/$subscriptionId/resourceGroups/$resourceGroup/providers/Microsoft.OperationalInsights/workspaces/LogAnalytics1/providers/Microsoft.SecurityInsights/dataConnectors/ContosoSecurityAlertsPushConnector?api-version=2025-06-01” \
–body @docs/bicep/devops/manual-steps/contoso-release-package/payloads/contoso-push-dc-recreate.json
This creates (or refreshes) the active runtime connector resource (`kind: Push`).
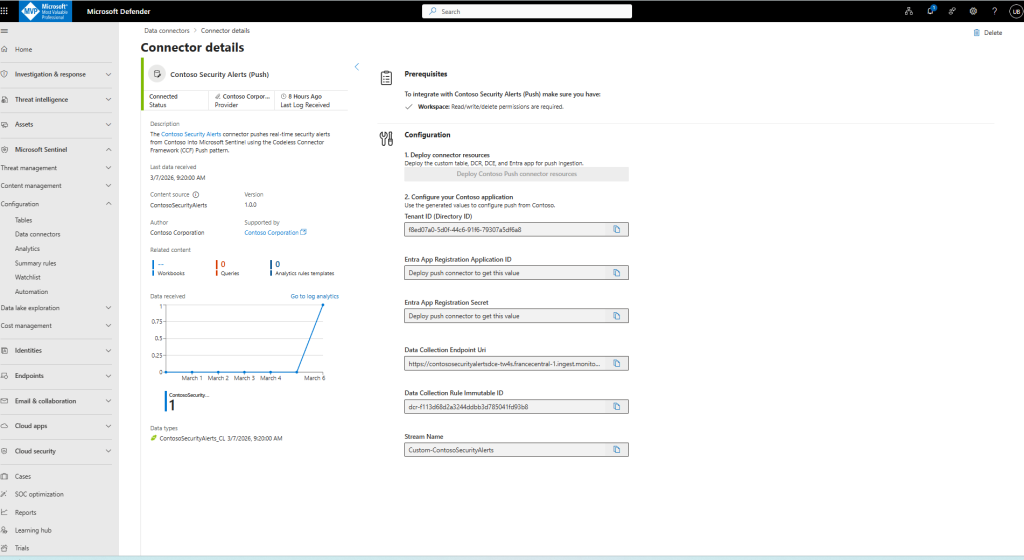
Step 4.3 — Connect in Sentinel portal
1. Open Microsoft Sentinel** → **Data connectors**.
2. Open Contoso Security Alerts (Push)**.
3. Click Deploy Contoso Push connector resources**.
4. Copy these values from labels:
– Tenant ID
– Application ID
– Application Secret
– Data Collection Endpoint URI
– Data Collection Rule Immutable ID
– Stream Name
5. Configure your source system to push logs with those values.
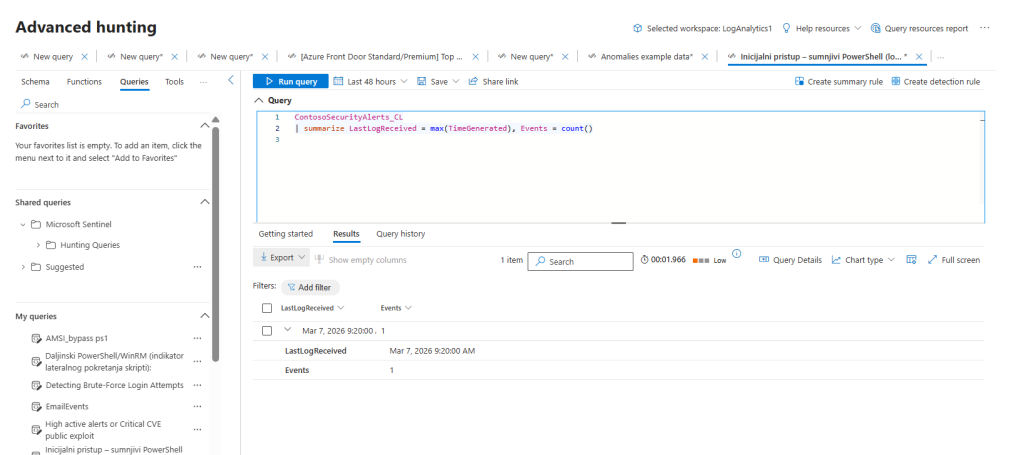
Step 4.4 — Verify ingestion and status
Run in Logs:
kusto KQL
ContosoSecurityAlerts_CL
| summarize LastLogReceived = max(TimeGenerated), Events = count()
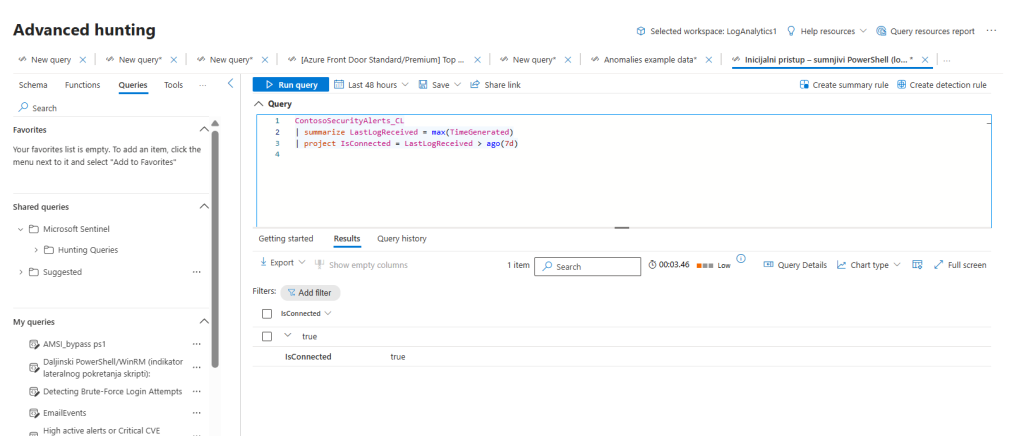
And connectivity signal:
kusto KQL
ContosoSecurityAlerts_CL
| summarize LastLogReceived = max(TimeGenerated)
| project IsConnected = LastLogReceived > ago(7d)
Expected outcome:
– events are present,
– `IsConnected` returns `true`.
Step 5 — Validate from three angles
I validated the connector from three independent perspectives:
- Control plane: Connector GET/readback confirms active state and correct config
- Data plane: KQL confirms records are present and
LastLogmoves forward - UX plane: Sentinel gallery shows connector as Connected
This three-layer validation avoids false confidence from checking only one signal.
Final outcome
The Contoso Push connector is deployed, active, and connected through native Sentinel CCF components.
What I got from this implementation:
- Faster connector delivery
- Cleaner operational model
- Better maintainability than custom ingestion middleware
- A repeatable pattern for future source onboardings
If you are evaluating CCF for your own Sentinel integrations, my biggest recommendation is simple: treat schema design and validation strategy as first-class work, not post-deployment tasks.
That is what turns a “deployed connector” into a reliable production connector with status connected.
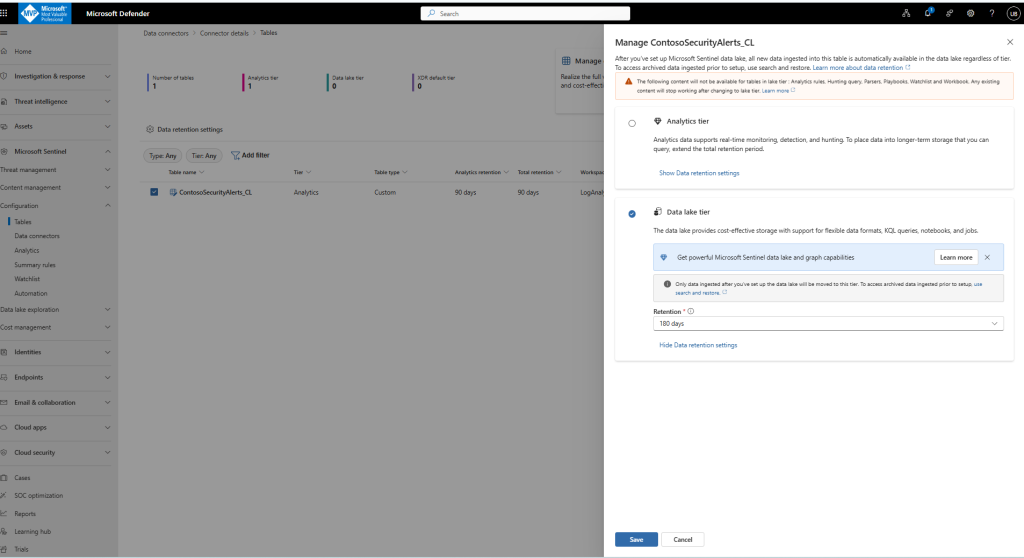
Manage ContosoSecurityAlerts_CL
After you’ve set up Microsoft Sentinel data lake, all new data ingested into this table is automatically available in the data lake regardless of tier. To access archived data ingested prior to setup, use search and restore.
Conclusion
Building this connector with Microsoft Sentinel’s Codeless Connector Framework demonstrated how far the platform has evolved in enabling fast, maintainable, and production-grade data ingestion — without writing or operating any custom middleware. By relying on declarative components such as Data Collection Rules (DCR), Data Collection Endpoints (DCE), and stream-bound schemas, the entire pipeline becomes predictable, observable, and easy to validate end-to-end.
What started as a minimally functional prototype quickly matured once strict validation was introduced at all layers — control plane, data plane, and user-facing configuration. This combination ensured schema consistency, stable bindings, and clean ingestion flows, ultimately leading to a reliable and fully Connected state in Sentinel. The transformation confirmed a key principle: CCF accelerates development, but disciplined engineering practices make the integration durable.
The broader takeaway is that CCF not only simplifies connector creation but also shifts engineering effort toward what truly matters — data quality, schema governance, and operational hygiene. Teams adopting this model can iterate faster, deploy more confidently, and avoid building (and maintaining) unnecessary ingestion infrastructure.
For anyone planning to build their own integrations, this project highlights a simple but powerful pattern: use CCF for speed, use validation for stability, and use secure configuration for long‑term sustainability. With these pillars in place, custom connectors can become first-class, production-ready components of the Sentinel ecosystem.